Tyler Pridgen teaches you how to Roger Roger
- Mar 5, 2024
- 10 min read
Updated: Aug 23, 2024

Jumping into the writer's chair this week is Tyler Pridgen! His inaugural article is about the love he holds for the cold, steely hearts of clankers. Tyler is going to breakdown why droids actually have AI: Based and why you should consider opening your heart to their crushing and oily embrace.
Get ready to be Roger Roger’ed, because I’m going to give you an analysis of how I crafted the Experimental Droids Battleforce that won the 2024 Cherokee Open. I will start by giving an overview of the battleforce’s special rules, the units allowed in the battleforce, and why the unique units for this battleforce are Bantha Poodoo. I’ll also give you a run down on some of the objective strategies I utilized during my games at the 2024 Cherokee Open. Grab yourself a can of oil and open fire!
Special Rules
The Experimental Droids battleforce (hereby referred to as the ExD BF) counts the special IG – 100 Magna Guard (Prototype Assassin Droids) as corps units! At first this might sound amazing… but this special unit leaves out a lot of goodies for a slight points reduction (more on this later).
Allowed units in this faction are fairly few. Your commander options are only the Super Tactical Droids (genERIC, Kalani, and Kraken), and the T-Series Tactical Droid (genERICA). Special Forces options are either BX-Series Droid Commandos (not the Strike Teams!), and the unique Magna Guards for the ExD BF. Corps unit options consist of 0-2 B1 Battle Droids, and 0-2 B2 Battle Droids. Support options? DrOidEkAs! The only Heavy option is the unique NR-N99 persuader-class Tank Droid (Prototype Tank Droid), which was basically stripped of all things good about the normal snail tank.
The best special rule with this battleforce is the unique surge token ability. To break it down, at the start of each activation phase, you choose up to 1 of your commander units, and put 3 surge tokens on that commander’s unit card. It’s important to note that these surge tokens are on the unit card, therefore, they can be banked in-between rounds if you don’t use them! Once during the activation of a friendly special forces/corps/support unit that has the AI keyword they may perform a free action to spend a surge token on the chosen commander unit’s card if it is at range 3. It’s important to note that free actions can only be performed after a unit has resolved their AI keyword, if it triggers (no modifying AI attacks with extra dice or aims tokens).
You can spend that surge to perform one of the following effects:
Increase their speed by 1 during their next move action this turn.
Gain 1 aim token or 1 dodge token.
Add 1 black die and 1 white die to their attack pool during their next attack action this turn.
Remove up to 2 suppression tokens.
The flexibility of this special rule is what gives the ExD BF its firepower and flexibility to play objectives.
Unique Rules


No Retinue, no Guardian, fewer upgrade slots, no offensive surging and weaker melee dice. Half-health models, less Courage, no point adjustments for heavy upgrades and all for a 12 point reduction.
This MagnaGuard folds like a Stormtrooper unit, and claps back like a wet paper towel. They offer a moderate answer to Armor and can keep a saber-wielder busy thanks to their Immune: Melee Pierce. Compared to the synergy that other options have with this battleforce, I firmly believe this unit to be a trap.


This poor snail. No offensive surge, no Critical 1, no Impact 1. All of this has been traded away for Arsenal 3 and a free “direct” order to a corps unit. (Not enough to Persuade me!) There’s not even a points difference between the two Snails! This snail could have been the answer to the ExD BDF major weakness, Armor. Had they kept the offensive keywords and surging offensive dice, this unit would have some serious teeth as a gunboat, but sadly I think...
Tyler’s Exd BF List – Cherokee Open 2024

Note This section isn’t a deep analysis of every unit. It will be a breakdown of why I picked certain units, what they bring to the table, and how they synergize with other aspects of the list.
The Tactical Bros (Commanders)


Kalani: The link that holds the entire list together. His melee and ranged offense aren’t even worth discussing; however, his keywords are amazing.
Strategize 2: 1 dodge and 1 aim on 2 units at range 1 is sooo good. You’ll want to do this on two BX units whenever possible, but B1s and B2s can make good use of extra tokens too if the BX’s are to far out.
Direct: AI Unit: Who doesn’t love more order control in a droid army? It’s a great way to give more orders in order to get the most out of Aggressive Tactics and the Super Tac command cards (don’t forget that the Super Tac 2 pip command card gives 1 dodge, Impervious, and Disengage to every unit issued an order from the Super Tac, not just the command card itself).
Sharp Shooter 2: This keyword is vital for one particular strategy: getting the most out of Orbital Strike. I normally open with the Orbital Strike command card on turn 1 whenever there is a squishy target I'd like to weaken/delete (such as white die saving speeders or white die saving corps/strike teams without defensive tech). Don’t be afraid to save your Sharpshooter 2 infinite range shot for later turns if there isn’t a good target round one. You never know if you’ll get the chance to finish off that single model unit leader that got away from your BX droids.
Reinforcements: Kalani can deploy last. Granted, he needs to be near your BX droids to get the full benefit of strategize, but this allows you to position Kalani perfectly to see your turn 1 Orbital Strike target!
Aggressive Tactics: Everyone loves surges. The BX usually take priority for getting them for defense rolls, but B2s and B1s also will utilize them for great offense/defense.


The genERICA T-Series Tactical Droid: Once again, offensive ability is not this gal’s strongest aspect. This unit will spend 95% of its time sitting behind a line-of-sight blocker and doing one of three things:
Bolster 2: Since the T-series will be near your units anyway, dishing out some more surges really helps whoever needs them.
Direct: Corps Droid Trooper Unit: This is the most important job of this unit! genERICA directs a B1 unit at range 2 of herself, that unit coordinates to the other nearby B1 units, then thaaaaat unit coordinates to either a BX unit or a B2 unit!
Give’em some of those special surges! I typically have the T-series near my B2s and B1s not only to direct orders, but also to “extend” the range of the special rule surges. In objectives that force you to be mobile (Bombing Run, Hostage Exchange, Capture the Supplies, etc.) you will want to boost the speed of your objective carrying units. Oftentimes Kalani is babysitting the BX droids and is out of range 3 to boost your objective units. So in his absence the inferior predecessor model will take the helm and give those units the fair and balanced boost they need.
The Busy Bs (Corps)

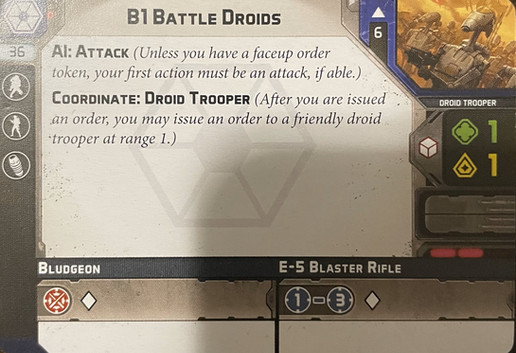


B1 Battle Droids are the heart and soul of every CIS list (seethe and cope you Geonosian lovers). Even though you can’t spam them, these 2 B1 units play a critical role in the ExD BF machine.
Coordinate: Spreading out more orders is always neat.
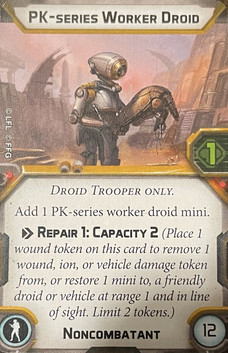
Repair, Repair, Repair! Four repair charges means your opponent will have to really work hard to kill your BX droids and B2s. Nothing is more demoralizing than sending 8 hits at a BX unit, losing 2 to cover, losing 2 more to shields, losing 1-2 to dodges, then getting 1-2 wounds through only to have BOTH repaired back by PK droids! Remember, you can bring back models that died that same round even if a live model in the unit has a wound (full power B2 shots anyone?).
Offense: I know B1s get joked at for having as much offensive capability as a pingpong ball… but please hear me out. When the E5-S has Critical 1, and they’re given 2 surge tokens (from Bolster & Aggressive Tactics) and they take an aim action, then they can do some WORK at range 3. White offense dice are a slot machine when it comes to results, but these fellows have a habit of finding all 7’s. They can dish out chip wounds, lay down range 4 suppression to slow down an enemy objective carrier, and can burn up an enemies defensive tech before the stronger BX shots hit (e.g. using up an Anakin dodge before the BX’s shoot. I’d rather take the guaranteed Djem So Mastery wound on B1’s any day). You could justify switching the E5-S for the E-60R if you’re expecting more armor, but I’ve found that Critical 1 is usually enough for me to handle 1-2 armored units (expecting double Darks and a Gav tank? Best take the Rocket!).


B2 Super Battle Droids do two things very well in the ExD BF:
Carry objective tokens: 8 health plus armor 1 and possible heavy cover makes B2s super hard to kill (unless you’re ‘roided up Dark Troopers at range 2). Combine that with the special surge spending ability to run as fast as that B2 from The Mandalorian and it’s the ultimate way to annoy your opponents.
Blast’em!: B2’s with the B2-HA and a few surge tokens/extra dice from the special surge ability and aim token can hit like a truck. White save units that rely on cover and Low Profile will fear them (thanks to their Blast keyword), and the B2’s help with the battleforce’s main weakness: Armor (Impact 2 baby!).
BX Force! (Special Forces)


This is the ultimate source of fire power in ExD BF. In my opinion 3 loaded BX droids with snipers, shields, Offensive Push and maybe Emergency Transponders should be the starting point for any ExD BF build. Let’s look at what they bring to the table:
Impervious: Blocking a lucky sniper crit after your shields are down? Very nice. It works best if you give the BX’s surge tokens, so be sure to prioritize!
Scale: Not as good as it used to be, but it is nice to ignore difficult terrain when “flooding” an objective like Intercept.
Scout 3: Scouting is good, more scouting is gooder. Scout 3 allows you to set up your range 5 sniper shots, or those range 3 alpha strikes. This keyword also allows you to start next to Supply Drop boxes round one and snag free upgrades before you move closer.
Sharpshooter 1: Less hits blocked by cover is always good.
Lethal 1: Red save armies suddenly aren’t that big of a deal. Especially when aims are easy to find thanks to Offensive Push and Strategize.
HUGE Dice Pools: If you spend a special surge token, this unit throws 9 white, 1 black, and 2 red dice with surge to hit at range 3! This is the deadliest dice pool in the entire Separatist faction, especially when you have Sharpshooter 1 and probably 1-2 aims.
Deflector Shields!: The shields allow you to just completely ignore two hits or crits, perform a Recover action, and get both charges back! This upgrade basically makes you “sniper-proof” and pairs very nicely with the Super Tactical Droid’s 3 pip command card to get two free recoveries.
How I play my objectives with Experimental Droids
Now I’m gonna breakdown how I approached the objectives in my Cherokee Open battledeck.


Bombing Run
First of all, avoid this objective if your opponent has an Armor skew list such as Tempest Force triple AT-ST or double Dark Troopers and Gav. I always give the bomb tokens to my B1 and B2 units. The hoard of B series units accompanied by genERICA sprint up to the enemy deployment zone ready to drop off their bombs using the increased speed from the special surge spending rules. Meanwhile my BX units and Kalani are “castling” up ready to play goalie against the opponents’ bomb carriers. BX snipers with the extra dice from the special rule followed up by Kalani’s Orbital Strike are great for deleting speeders and other white save bomb carrying units.
In a "worst case" scenario where you are up against three speeders, you can reasonably expect your opponent to get 2 bombs into your deployment zone. If this happens, chances are you will be dropping off as many or more with your own units. Don’t forget that you can boost your bomb goalies to speed 3 with the special surges and grab poorly dropped bombs before they get a chance to detonate at the end of round! Smart deployment of your bomb goalies is critical to delaying bomb drops by your opponent; thus giving you more time to kill the bomb carrier units before they can score.

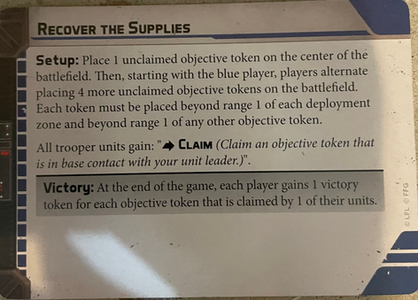
Recover the Supplies
It might sound simple, but the way I approach this objective is to walk a unit of B2’s towards the middle box with the rest of my force in tow. Then once I have it, I just run away with the box while shooting anything that gets close. Easy.
I absolutely use the special surges for speed 3 moves in order to get my B2’s in and out of the center quickly. Don’t forget to utilize the Super Tactical Droid’s 2 pip command card to give your box carriers Disengage when threatened by melee threats (Wookiees, saber wielders, etc). This’ll ensure those brawlers can’t impede your progress. I usually use my lowly T-series or B1’s to get the other two boxes since they’re safer.


Hostage Exchange
This calls for virtually the same tactics utilized in Recover the Supplies. I give the hostage to a B2 unit, make sure it has an order during round 1 for a double move, then spend the special surge to increase one of its movements to speed 2. If necessary, use your Disengage command card in round 2 to save your shiny metal rear from melee entanglements. While your hostage carrier is running back, your BX droids are hitting either your opponent’s weakest unit or a unit that is worth more than your B2’s (if you think your first B2 carrier won’t make it back alive).
Most of my Hostage Exchange games end in a tie for victory points, so I try to win the kill points tie breaker game early on. Once you have the kill points lead, switch to an exceedingly brave “shoot and run away” strategy to punish any units chasing after you.


Intercept the Transmissions
I prefer to run my force towards the middle point early, and hold it for as long as possible. genERICA holds my back point while directing orders, and the rest of the army stays entrenched to keep anything from getting through to her. It's not a particularly original idea, but it darn well works.
There you have it! This list packs the firepower and flexibility to dominate the objectives while ripping apart your opponents’ units. It takes a fair amount of practice to get all your units working in sync; but once you do it’s a simple matter of taking your practiced principles and applying them to the situation at hand. Predict your opponents’ disruptive shenanigans, know what objectives you do better than them, and prepare yourself for the turn zero flop.
The biggest predator of this list is an Armor skew. Don’t just hope to “roll crits,” you need to play the objective. Utilize the terrain to minimize your own losses while eliminating opposing units that can interact with the objective. In my Cherokee build I took a HUGE 10 point bid to guarantee my battledeck was used in turn zero. I want short edge deployments, objectives that don’t only favor vehicles, as well as neutral condition cards.
If you want to play Experimental Droids, you should absolutely take a bid. This allows you to walk up to your opponent at the next tournament and say: “Welcome to Mr. Roger Roger’s neighborhood, now put away your silly objective deck with Hemmed In and Payload; it’s time to get Roger’ed!”

As always, WATCH THOSE WRIST ROCKETS!
-Tyler Pridgen


Comments